How to play
The short version: let the swords fight, stay out of anything glowing on the ground, spend spirit stones on your arts, and break through when the cultivation bar is full.
Fighting
Your flying swords attack the nearest monster on their own. You walk, and you dodge with Space: a short dash you cannot be hurt in. Sword Qi (1) cuts a line in front of you. Thunder (2) opens at Foundation and strikes the crowd. Sword Rain (3) opens on floor 4 and fills up as you kill; it also interrupts a guardian's big attack. Clear the floor and a portal opens; follow the arrows on the ground.
Warnings on the ground
Attacks that hurt are drawn on the ground before they land: a red line before a boar charges, rings before a stomp, gold shapes before the abbot's bells and palms. Step out before the shape fills up.
Auto
Press F (or the Auto button) and the hero walks, fights and dodges by himself. He dodges worse than you do.
Why Auto keeps going back to the same floor
This is on purpose, not a bug. When a floor beats the hero on Auto (say floor 54), he drops one floor (53) and trains there: the portal leads back to 53, and a bar at the top says how many more clears are left. After 3 clears of floor 53 he tries 54 again. Losing costs nothing, and farming 53 still pays spirit stones and cultivation. If floor 54 beats him twice in a row, he stops trying and stays on 53, so he does not keep losing; the bar then shows Grow stronger and Try again. He tries 54 again by himself as soon as you grow stronger (raise an art, break through, pick a perk, wear better gear, or strengthen or raise a piece at the forge), or at once if you press Try again. Grow stronger lists what you can do right now. To go up at any time, turn Auto off and walk into the portal yourself.
Spirit stones and arts
Monsters drop spirit stones. Spend them at the Arts stele: Sword Qi raises attack, Sword Flight adds a flying sword, Breathing speeds up cultivation, Body Tempering raises health. Each level costs more than the last, and the higher an art, the less each level adds: Sword Qi gives +4% attack a level up to level 50, +2% up to 100 and +1% after that. The arts screen shows what the next level gives.
Cultivation and breakthroughs
Kills and meditation fill the cultivation bar. Each major realm is split into layers: Qi Refining has twelve, the others nine and a Great Perfection. When the bar is full you move up a layer on your own, a little stronger each time. Entering an early, middle or late stage (for Qi Refining layers 1, 5 and 9; for the others 1, 4 and 7) waits for you to press R, and lets you pick one of three perks. The step into the next major realm needs a guardian and a tribulation.
Perks
Twenty-four perks on four paths: Sword, Thunder, Body and Fortune, in four grades from Common to Legend. Each has a one-line description, and the game marks the one that fits the path you are already on.
Tribulation
The step into the next major realm (Foundation, Golden Core, Nascent Soul, Deity Transformation) needs a guardian beaten first, then a tribulation on the peak. Bolts fall in waves: step out of the purple circles or dodge through them, and shout your defiance to raise a shield. Fail, and you lose a fifth of your cultivation and can try again after 30 seconds. Your first success unlocks a second look, the rogue, which you can wear at the bronze mirror.
Gear: where it comes from
Monsters sometimes drop weapons, robes and treasures; a floor guardian always drops a treasure chest with one or two pieces of Spirit grade or better. Press B (or the Bag button) to open the Bag. The hero board on the left shows your Power (one number for how strong you are) and your main stats; the green figures are what worn gear adds.
Gear: grades and stats
Pieces come in four grades: Common (grey), Spirit (green), Immortal (purple) and Legend (gold). Legends only drop once you have formed your Golden Core (after its tribulation), about one drop in a hundred and more often from floor guardians. No two pieces are quite alike. A piece's own stats land anywhere within 15% either side of the usual value, and it rolls random bonus lines on top: Common 0–1, Spirit 1–2, Immortal 2–3, Legend 3–4, each with its own number inside a range. The card shows a Roll percentage: how lucky the piece was, from 0% (every number at the bottom of its range) to 100% (every number at the top, with the extra line). Pieces from higher in the Endless Climb are stronger: every ten floors is a step up. A percentage on gear (Attack, Health, Cultivation speed and so on) counts on its own: the same stat’s percentages on everything you wear are added up, then multiply the hero, so arts never water them down. A robe that says Health +40% really gives 40% more Health.
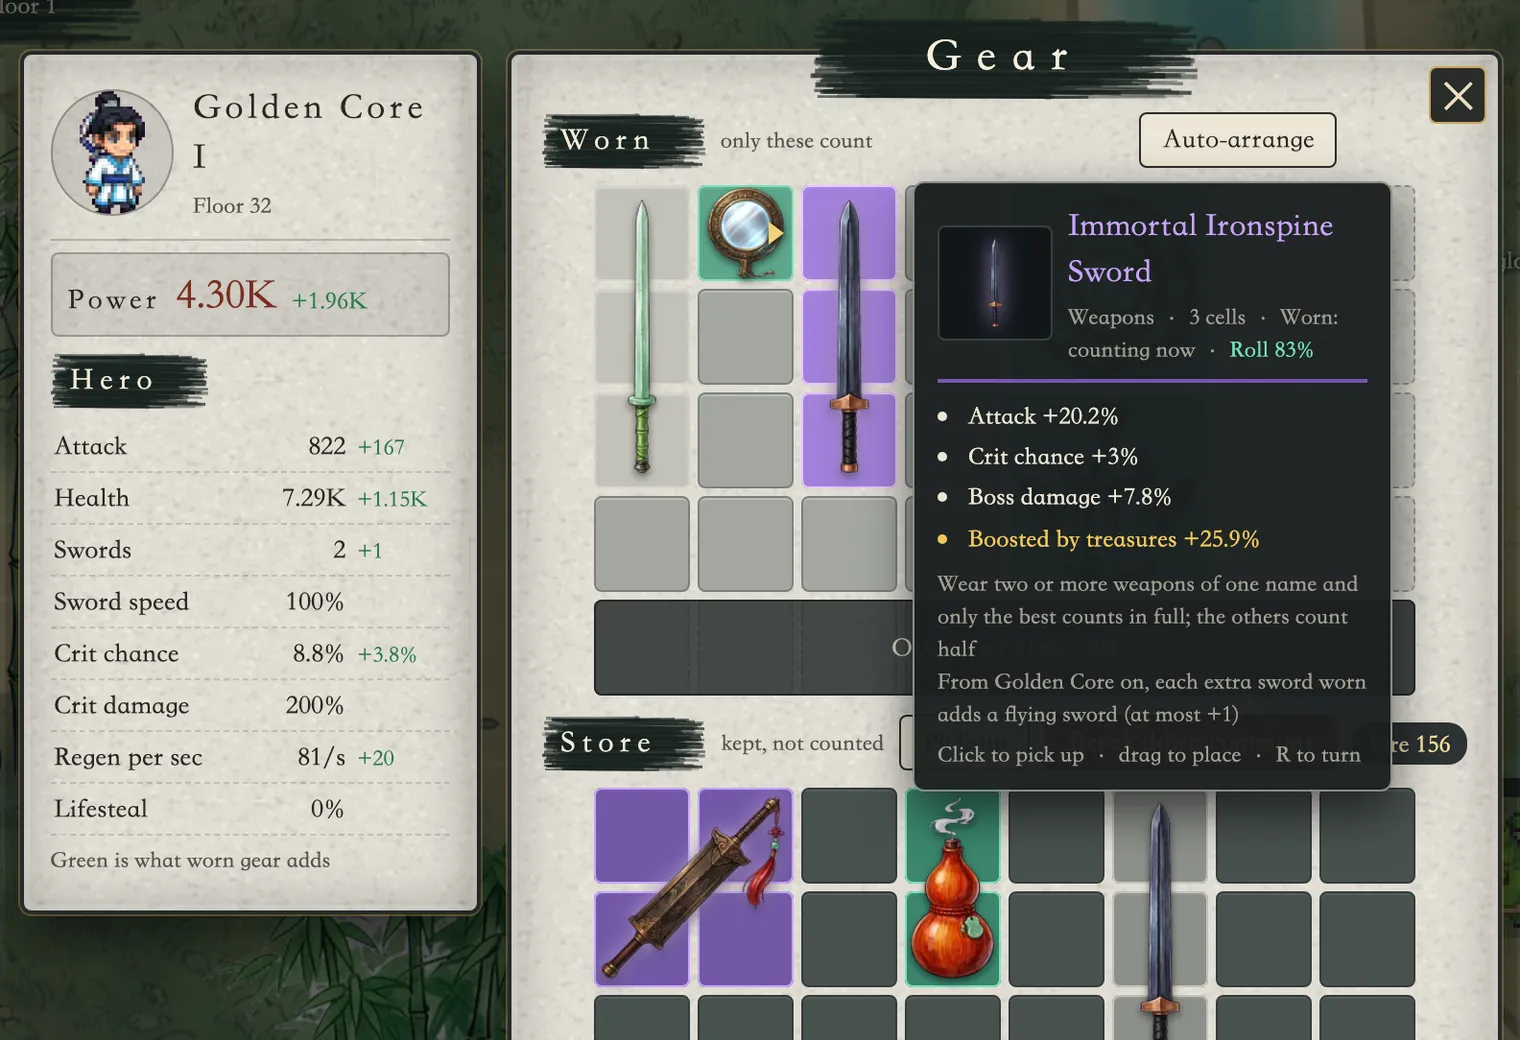
Gear: laying it out
Only what sits in the Worn grid (the top part of the Bag) counts; the Store underneath just keeps things. Every piece is a block of cells, and blocks cannot overlap or stick out over the edge. With a mouse, drag a piece; on a phone, tap it to pick it up and tap a cell to put it down. Press R or Turn to turn the piece you hold, and Put back to drop it where it was. While you hold a piece, the spot under it shows the change in Power, and the best spot is dashed in gold. Auto-arrange lays out the whole Worn grid for the most Power in one go. The Worn grid grows at Foundation, at Golden Core and every 20 floors of the Endless Climb; cells still locked are drawn in, with the step that opens them.
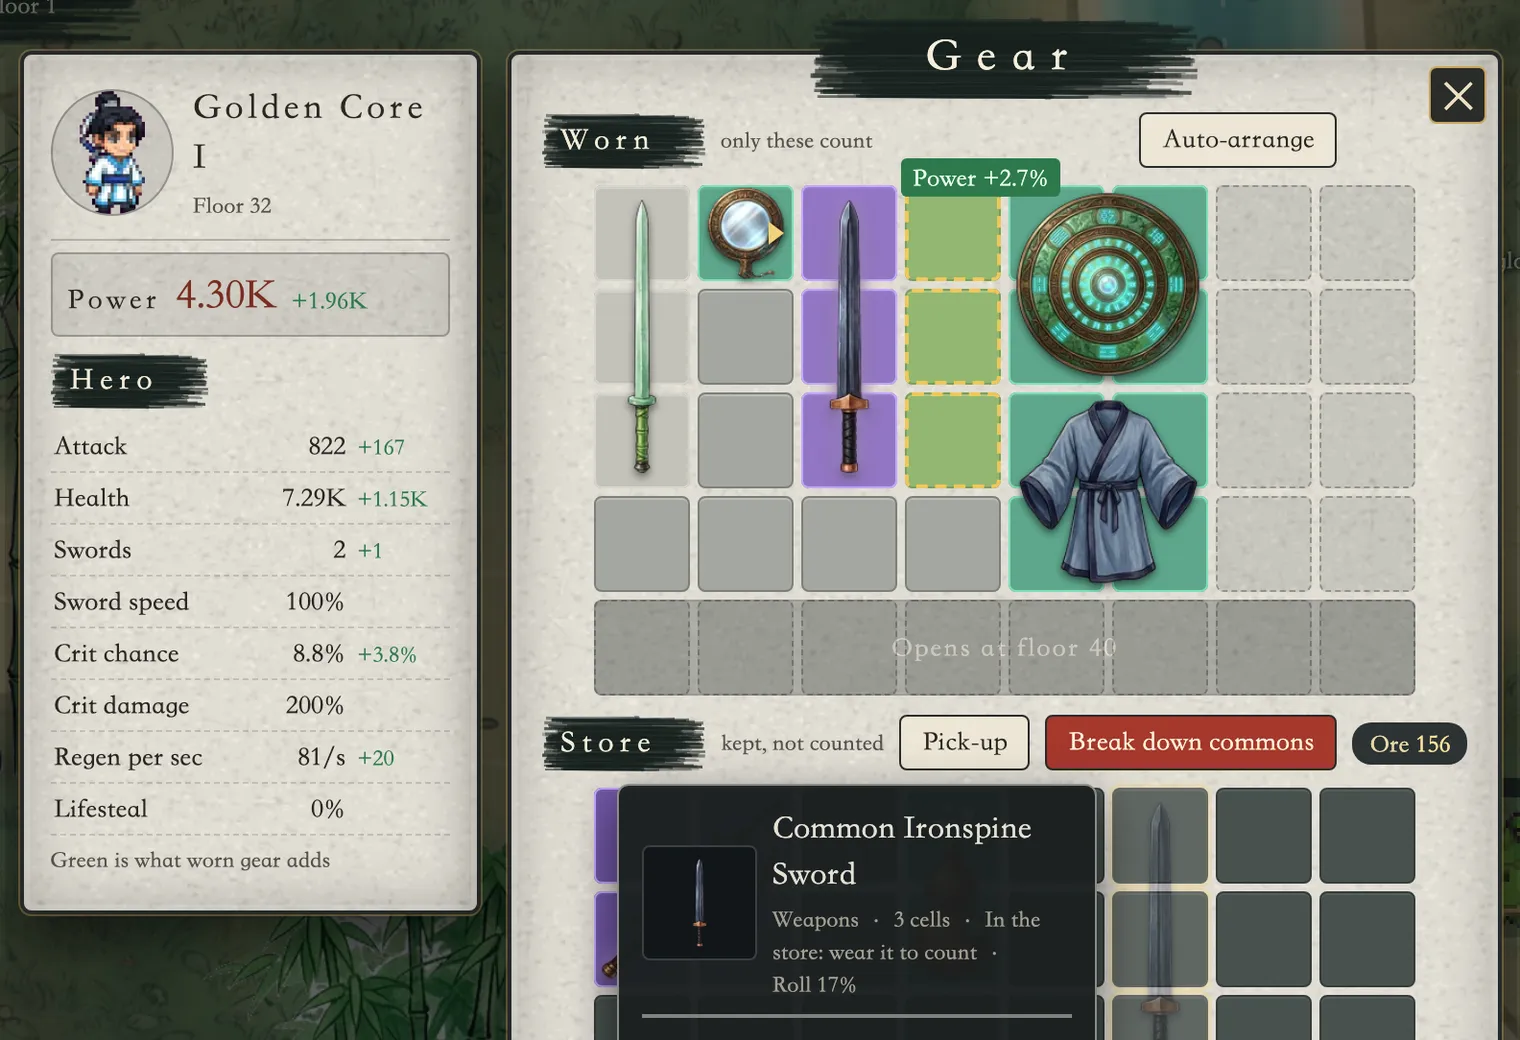
Gear: what counts
Everything in the Worn grid counts, with four rules. You wear one robe at a time. Of each treasure name only the best one works. You may wear several weapons of the same name, but only the best counts in full and the others count half, so mixing kinds pays. And from Golden Core on, one extra sword in the Worn grid adds one more flying sword (at most one; two from the Nascent Soul on, three from Deity Transformation).
Treasures
Treasures give little themselves and act on the cells around them. Each one has a reach: the four cells touching it, the eight around it, its whole row, or the two cells in front of it (the mirror; turn it to aim). Some make the lines of weapons or robes in reach bigger, some give a bonus for every piece in reach, and the sword case only works with nothing next to it. Point at a treasure and its reach lights up gold; the pieces it is acting on get a gold rim.
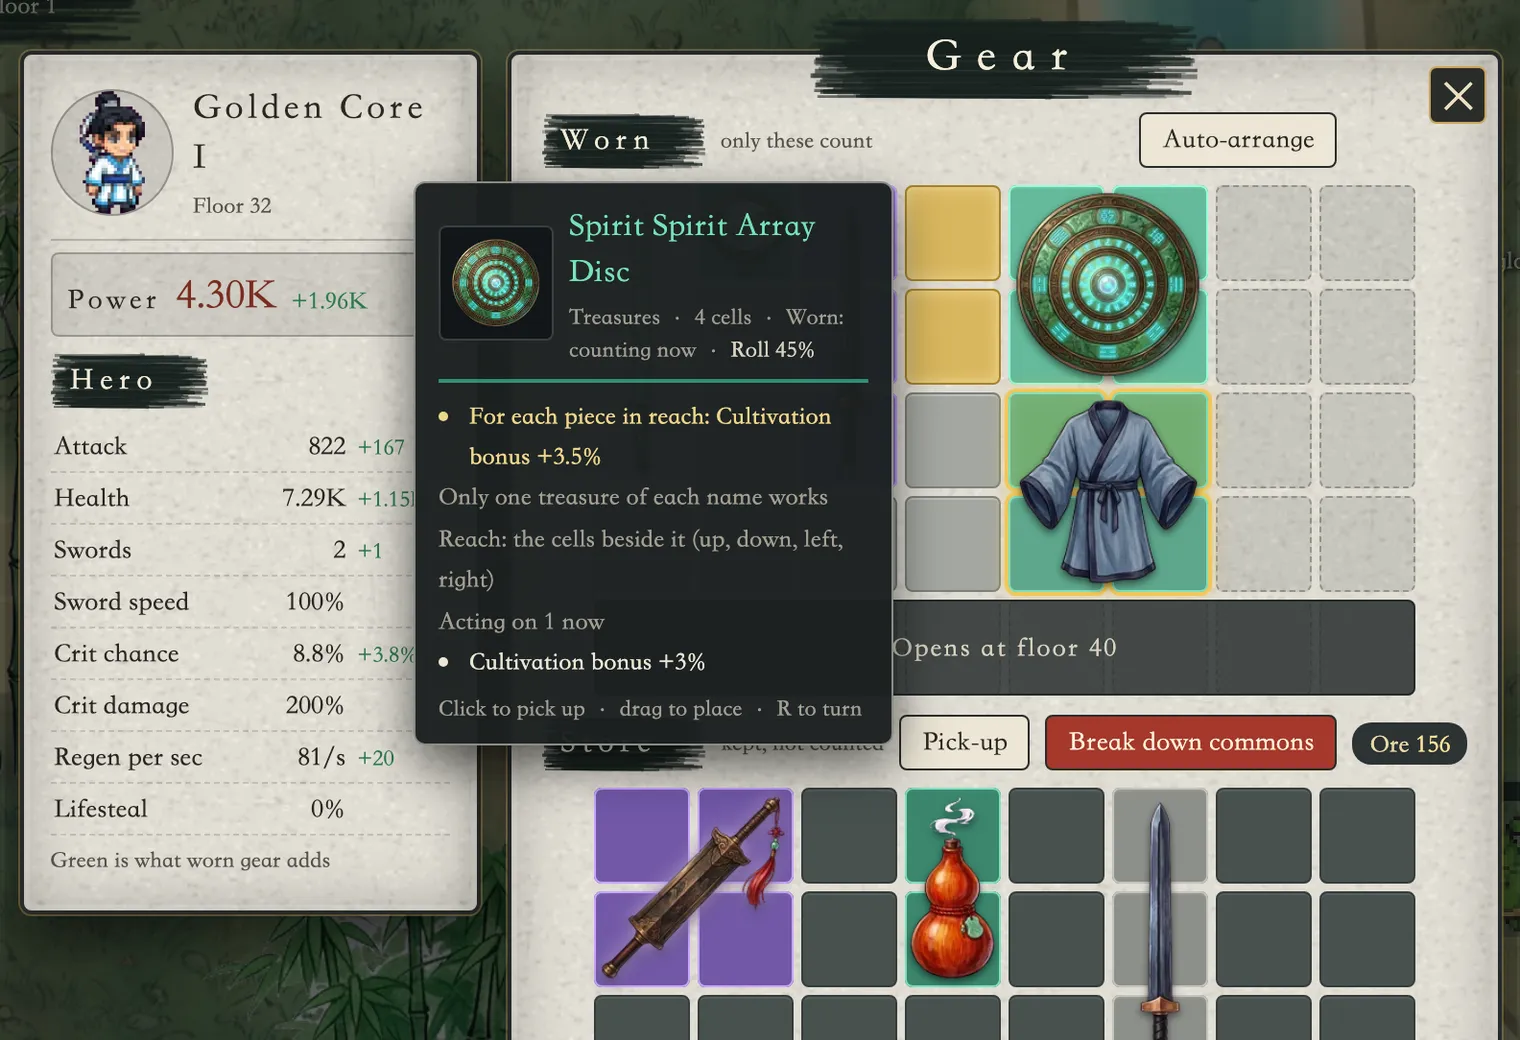
Picking up and breaking down
In Settings, under Pick-up (or the Pick-up button beside the Store), choose which grades and kinds to keep. Anything else becomes ore as it drops, and when the Store is full new Common pieces become ore too. Break down pieces you do not need from their card, or every Common piece in the Store at once. Ore is for the sword forge.
The sword forge
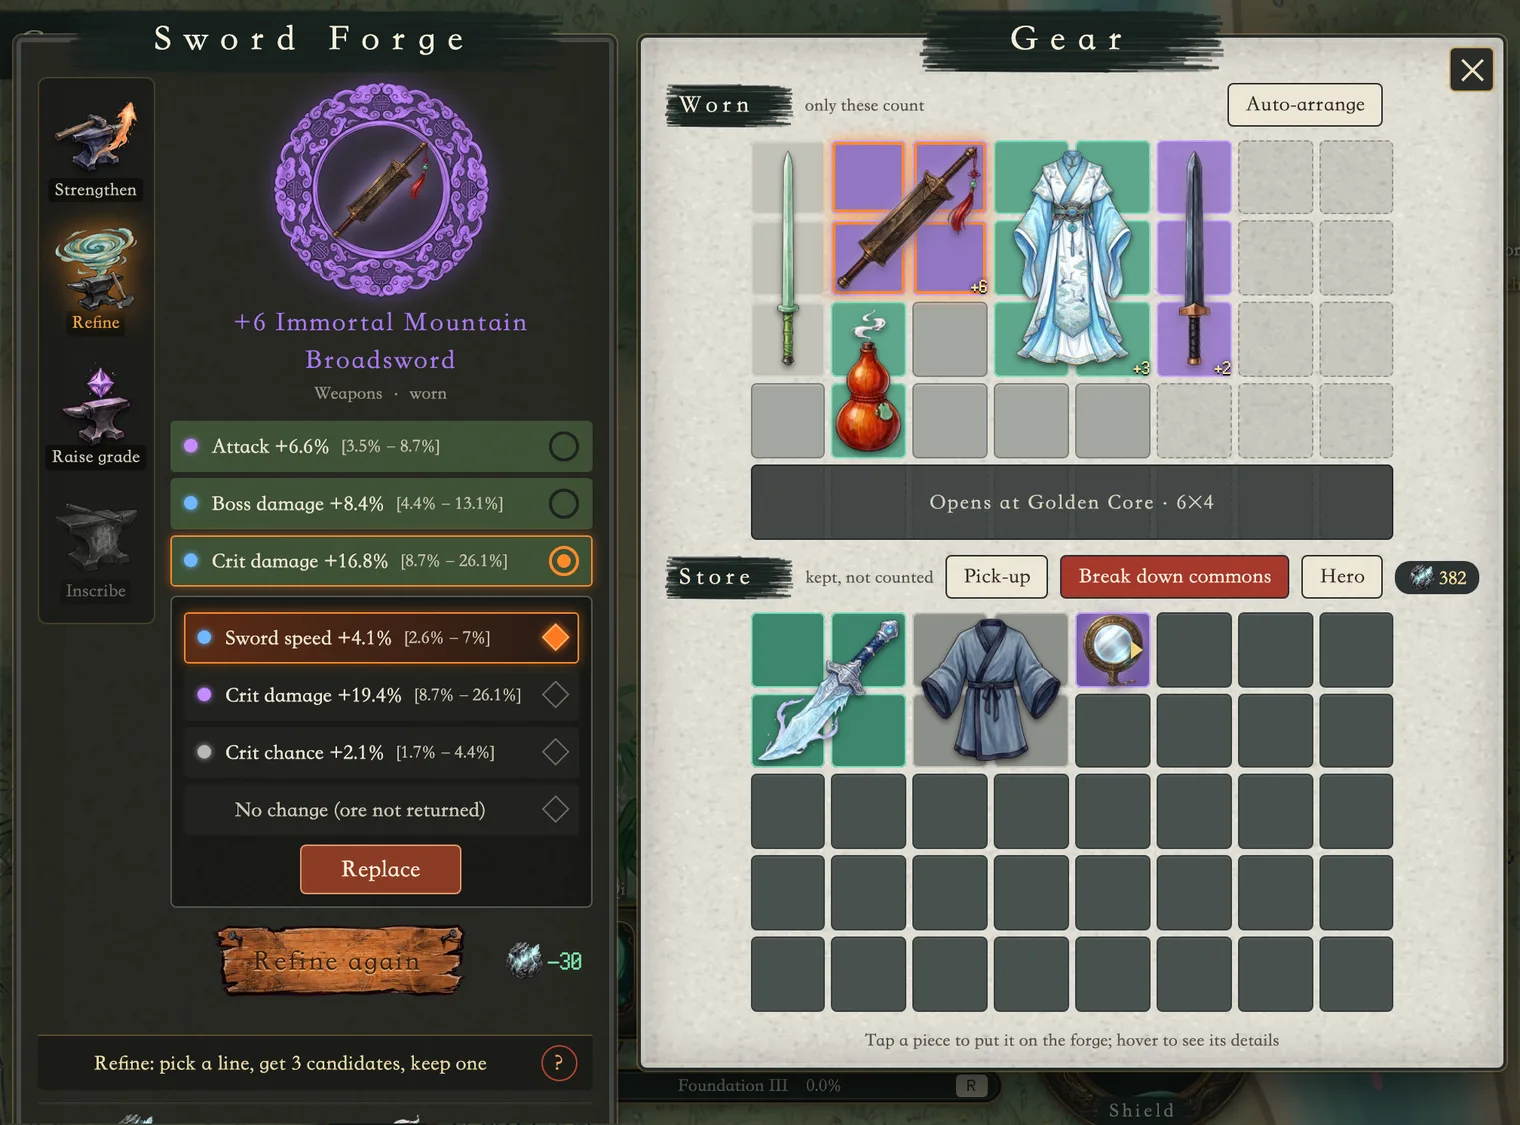
Click the sword forge in the cave, or the Sword Forge button on the Bag’s store bar. The forge opens beside the Bag: tap a piece in the Bag to work on it. Three tabs run down its left side. Strengthen: spend ore to take a piece from +1 up to +10. Each level adds 10% to its own stats (not its lines). It never fails and never drops a level, and each level costs more. Refine: tap the line you want to change, then Refine. You get 3 candidates (never a stat another line already has); pick one and press Replace, or pick No change. The ore is spent either way. The candidates wait for you even if you close the forge, and higher grades cost more to refine. Raise grade: spend essence and ore to turn Common into Spirit or Spirit into Immortal, with bigger stats of its own and one more random line. Legends only drop and cannot be made. Essence only comes from floor guardians: each one drops 1 the first time it falls, and sometimes again after that. Breaking down a strengthened piece gives back most of the ore spent on it, so strengthening what you wear now is never wasted. The forge uses only ore and essence, never spirit stones.
The cave
Press H to go home (not in the middle of a fight: clear the floor first, or go home from the knocked-out card). In the cave you meditate on the cushion (Space), upgrade arts at the stele, read your perks on the scroll rack and change your look at the mirror. Sitting in the cave earns the same as being away: spirit stones and cultivation, for up to 8 hours.
The Burning Wastes and Deity Transformation
Floors 31–40 are a step harder than the marsh. Do not stand in fire: crows leave it behind them and lava golems leave a pool where they land. A golem takes half damage until its crust breaks. A red ring under your feet means a scorpion is coming up, so move. Kill an ember spirit before it lights itself, or get away. The Sky-Burning Phoenix drops meteors, breathes a wall of fire and fans out feathers; at half health she curls into an egg, and if you do not break it in time she heals. Beat her, pass a nine-bolt tribulation and you reach Deity Transformation: a translucent dharma image stands behind you.
The Endless Climb
Each guardian opens the way on: the Faceless Abbot opens the Thunder Marsh (floors 21–30), the Flood-Dragon King opens the Burning Wastes (31–40), and the Sky-Burning Phoenix opens the climb past 40 for good. Realms are cultivated on the way up. Every ten floors take the look of one of the four maps in turn, with a guardian on the tenth. Each floor is a little harder than the last, so the climb is steady and gets slower the higher you go.
Keys
| WASD / arrow keys | Walk |
|---|---|
| Space | Dodge · shout in a tribulation · meditate in the cave |
| 1 | Sword Qi |
| 2 | Thunder |
| 3 or Q | Sword Rain |
| F | Auto on or off |
| G | Arts |
| C | Perks |
| R | Break through |
| H | Cave / back out |
| M | Bronze mirror |
| Esc | Settings |
On a phone, hold anywhere on the left half of the screen and drag to walk. The skills and dodge sit at the bottom right.